 If you've followed this blog at all or if you're a member of the Bay Area Photo Club, you probably know that last fall I along with a couple of fellow BAPC members went to the Texas Renaissance Festival to photograph people. Larry J. Patrick gave a great body of work presentation on some of those images, and I've posted a lot of my portraits here on this blog. It was probably a turning point for my photography. It made me much more comfortable shooting people and using flash, and it gave me the opportunity to learn new skills retouching portraits. While 90% of images from that day were portraits of people, we did make one stop at a booth selling soaps and oils. I took a few shots of these wavy bottles filled with different colored oils (above). So, here's a non-portrait shot from that day -- abstracted even further with some color saturation and a special Photoshop plug-in called Fractalius, which transforms sharp edges into feather-like highlights.
Wednesday, July 29, 2009
Renaissance Festival Abstract
If you've followed this blog at all or if you're a member of the Bay Area Photo Club, you probably know that last fall I along with a couple of fellow BAPC members went to the Texas Renaissance Festival to photograph people. Larry J. Patrick gave a great body of work presentation on some of those images, and I've posted a lot of my portraits here on this blog. It was probably a turning point for my photography. It made me much more comfortable shooting people and using flash, and it gave me the opportunity to learn new skills retouching portraits. While 90% of images from that day were portraits of people, we did make one stop at a booth selling soaps and oils. I took a few shots of these wavy bottles filled with different colored oils (above). So, here's a non-portrait shot from that day -- abstracted even further with some color saturation and a special Photoshop plug-in called Fractalius, which transforms sharp edges into feather-like highlights.Saturday, July 25, 2009
Why I Didn't Use Lucis Art
 So, this looks like Lucis, right? Or HDR or something, huh? Nope, plain Photoshop layers -- and it's a monster of a file. It was taken along Skyline Drive in Shenandoah National Park during our trip there in May. It's taken from the Moormans River Overlook about 5 miles north of Waynesboro, Virginia. This is a five-frame hand-held panorama stitched together with Photoshop's wonderful photomerge feature. Amazing, five vertical frames handheld and Photoshop manages to get this from those frames -- well, not exactly. Below is what actually came straight out of the merge -- a difficult exposure with all those clouds. And since I was handholding and shooting a panorama, bracketing wasn't a possibility. Since I knew there were some dramatic clouds here that I wanted to bring out, I thought fine, I'll just use Lucis to bring them up. Well, Lucis choked on this file. The base layer was 122 megs, and I guess that was too much for the filter, because it errored every time I tried it. So, I decided to go for the same look in Photoshop. The result: 10 layers and 986 megabytes on my 46.25" x 20.25" file at 240 dpi. OK, I can probably delete 2 or 3 layers. I've never even come close to a gigabyte file, but this one taxes Photoshop. The key layers in the mix are a black and white layer created with Nik Silver Efex put into luminosity blending mode at 88%, then a couple of color balance and curves layers above that to bring up the color and contrast in the sky. No Lucis this time, but I don't want to work on 986 megabyte Photoshop files every day either.
Thursday, July 23, 2009
Why I Use Lucis Art #5
 This image probably epitomizes why I use Lucis Art. The photo was taken near the Strand in Galveston -- I think for the "Old Galveston" assignment for the Bay Area Photo Club within the last year. I feel both the sky and architecture really benefit from the Lucis Art treatment - and it was literally applied in one step, opening the shadows and amping up the clouds in one dialog box. My Lucis-ed version is on the left; the original out-of-camera version is on the right for comparison. In addition to Lucis, I also did some perspective correction and used Nik Silver Efex to do the black and white conversion. I've taken lots of photos over the last six years, since seriously jumping into digital, but this one somehow stays with me. It's, by far, not my best...probably wouldn't make any type of portfolio I would ever present. But there's something about it that lingers with me. I've studied it, printed it, but never presented it. And the more I think about it, it's probably the conflict here that appeals to me -- the corner office where a worker sits patiently doing his job for 30 years, while the world in all its glory passes by.
Monday, July 20, 2009
Why I Use Lucis Art #4
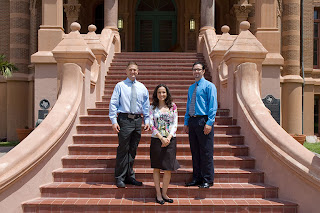
 As much as I like the effect Lucis has on architecture, it does some awfully strange things to skintones and natural creases in the skin. If there's any place you don't want grit and grunge, it's probably in the face. But you can always use a well-placed mask. This photo was taken a few weeks ago in front of Old Red on the UTMB campus, the oldest medical school building in Texas -- completed in 1891 and surivor of the 1900 Storm. Right now it's vacant and awaiting repairs from Ike, but it's a common backdrop for group photos. These three happy residents recently graduated from our plastic surgery program. I did this version with a Lucis Art layer masked only to the building, keeping the effect off the three people.
As per Shirley's request, here's the original image...
Saturday, July 18, 2009
Why I Use Lucis Art #3
 This image was taken in May from the front porch of Montpelier, near Charlotttesville, Virginia. Lucis Art was used to enhance the clouds here. It almost seems like cheating at times. Honestly, you can create the most incredible cloudy skies from almost nothing. There is magic in that program that transforms a normal sky into something other-wordly. But that brings up an interesting point. Along with using Lucis, I've been doing some HDR during the last couple of years, and when you try and use Lucis on top of a tonemapped HDR -- well it's too much of a good thing. The sky becomes terribly grainy and begins to fall apart. But if you're on vacation, in a place you probably won't ever be again, have limited time, and possibly have an impatient spouse ready to move on to the next site, and you want this great dynamic sky -- Lucis is the answer.
Wednesday, July 15, 2009
Why I Use Lucis Art #2

 After my first post in this series, I thought it might be helpful to see the straight out of camera version and the final Lucis version of these examples of why I use the Lucis Art plug-in. The photo at the top, here, is my final presentation version -- used for a high key assignment for the Bay Area Photo Club last summer. OK, so it wasn't the best choice for high key. But I think the before and after really shows how dramatically you can open the shadows in a photo with Lucis. The image was taken in Chicago, near Graceland Cemetery under the El tracks during the middle of the day. I didn't have a tripod and didn't want to spend alot of time making this shot because I had just spent a couple of hours shooting in the cemetery, and frankly I was pretty tired. I was literally walking to the El stop when I passed under the tracks, stopped and took 2-3 shots and moved on -- no brackets, no real thought of looking at the histogram -- I just knew I should take an "under the El" shot while I was in Chicago, and this seemed to be an OK view. Straight in, no real thought of composition, just raised the camera to the eye and knocked down the shot. I guess the fact that it was so high contrast made me think of pushing it toward high key, and ultimately brought me down the road of trying to open the dark shadows in this scene. I'll admit, cropping it square did wonders for simplifying the image. But in the end as I look back at my Photoshop file, my last layer in the 6-8 layer stack was a Lucis Art layer that just brought out incredible detail in the structure. So, why do I use Lucis Art #2? It absolutely makes architectural photos sing.
Tuesday, July 14, 2009
Why I Use Lucis Art #1
 I use the Lucis Art plug-in for Photoshop, I confess. From the first time I saw it I liked it. I've seen it used in extreme ways that I don't care for, but in the majority of times I see it used I like it. In one operation in Photoshop you can get a simulated HDR look -- it opens the shadows, makes clouds very dynamic, and sharpens the midtones. So, the next series of photos on this blog will be uses for Lucis Art that I've discovered in the two years that I've been using the plug-in. All this being said, the makers of Lucis have completely revamped the software and pricing. It now costs between $275 and $375 for the plug-in -- a bit steep in the world of third-party Photoshop plug-ins. So if I didn't already own it, I might consider Topaz or using lots of layers in Photoshop to simulate the look. But as long as I own it and it continues to work with the version of Photoshop I have, I'll continue to use it. In fact, I probably use it to some degree in about 75% of my images.
This first image was taken from atop the San Jacinto Monument a few weeks ago. You can see the Battleship Texas in the lower right and the Houston Ship Channel running along side it. Lucis Art brought out a lot of detail in the land, great midtone contrast in the clouds, and nicely saturated colors - in one dialog box.
Wednesday, July 8, 2009
...at such a young age
 There's a term in digital photography called "chimping." It's one of those words that's evolved into common vernacular in the days of high resolution LCD displays on the backs of dSLRs. The reasoning holds that photographers at all skill levels can't help but take a peek at their images on the 2- to 3-inch displays on the backs of their cameras. And in their excitement over the good photos, they make this monkey-like grunt. It's all explained here in a video I saw several years ago on SportsShooter.com. The photo above was taken at the Bay Area Photo Club field trip last Saturday. This is a photo of Colleen and her niece, and as you can see -- this chimping phenomenon starts early in life.
Thursday, July 2, 2009
Saturday in the Park
 This past weekend, the Bay Area Photo Club held one of our monthly field trips, this time shooting informal portraits at a local park. Since we started taking photos around 7:00 p.m. to get the best light and cooler temperatures, most photographers used off-camera speedlights to add a little pop to the images. The photo above is of Celeste, a coworker of mine, and her daughter. Celeste, her sister Colleen, and Celeste's daughter were gracious and patient enough with us to let themselves be our test subjects for about an hour - a big thank you to them.
It seems like almost every time I work with my flash I learn a thing or two. Instead of throwing it on the hotshoe and shooting TTL, it's really amazing the power of those small units when used creatively and efficiently. The image above was lit with a Nikon SB800 shot through a small softbox high and off-camera left at 1/8 power; exposed at 1/125 sec at f/4 in manual mode.
Subscribe to:
Posts (Atom)